Abstract
This document focuses on summarizing best known practices for creating avatars which work with the current LIV version. LIV supports two formats .avatars and VRM. Each format has its pros and cons. VRM avatars can be created by avatar creation software like VRoid and there are many you can download. The .avatar format may be known by Beat Saber players using the Custom Avatars plugin by Nicoco007. Note that avatars created for LIV won’t be compatible with Beat Saber.
.Avatar Format
Certain old Beat Saber avatars in the .avatar format will work with LIV but many of those are not properly set up and often do not have full body tracking setup and thus only the head and hands will be tracked. Certain Beat Saber shaders do not work in LIV (Ikeiwa’s Uber and Tach’s Complete Beat Saber Shader are known not to work). It is recommended thus to compile your own avatar for the use in LIV using non-Beat Saber shaders.
Where to get avatars
You can find both free or paid avatars on the internet. https://gumroad.com/ and http://booth.pm are two popular sites where people get avatars. You can also commission an avatar or create your own with tools like VRoid (https://vroid.com/studio) which do not require any 3d modeling knowledge.
The avatar should contain the actual 3d model of the avatar, a humanoid rig (skeleton that will make the avatar move), and materials/textures. Easiest way to look for avatars ready for VR is to look for VRChat avatars.
Avatars will be often provided in Unity packages (.unitypackage) that are ready to be imported into Unity with everything set up for VRChat. You can also find avatars in FBX or VRM format.
In order to create an avatar file format you will need the rigged avatar in FBX format with textures (which do not need to be included in the file, by default they aren’t).
If you have an avatar in Unity package you will first need to import it into a project containing what the avatar needs (for example the Avatars SDK3 for PhysBones, custom shader if the avatar uses one like Poiyomi). The avatar description should have written what Unity build it was built with and what needs to be imported into Unity first before importing this specific avatar.
If the avatar is old and was made with either SDK2 or SDK3 in Unity Build 2018.4.20f1 you can directly import this avatar into the LIV project to create the LIV avatar as anything used (except PhysBones script from SDK3) is compatible. If the avatar is already done with any 2019 Unity build you will have to set up the avatar from the beginning yourself in a 2018 Unity build.
Creating custom avatars
The avatar creation process is similar to Nicoco007 Custom Avatars one.
Video tutorial https://youtu.be/8AtbMZvQdW4
Setup in steps
- Get a 3d model with a humanoid rig. Check that the model is in proper t-pose, at position 0,0,0, and has a center between the avatar’s feet (that being the point 0,0,0). Create visemes and/or named them: v_sil, v_PP, v_FF, v_TH, v_DD, v_kk, v_CH, v_SS, v_nn, v_RR, v_aa, v_E, v_I, v_O, v_U.
- Download this Unity project -> https://drive.google.com/file/d/1YzJamlspmbri-bLa_MARe9sVZpBWaEVW/view?usp=sharing
- Download Unity 2018.4.11f1
- Unzip the project, add that folder in Unity Hub as a project, select Unity build that can run it.
- Open the project and import your model via Import new asset.
- Change the rig to Humanoid. Fix any errors marked in red or unassign bones that are not properly assigned.
- Extract materials and textures to a folder. Set up your materials with shaders of your choice and assign them.
- Drag the model into the scene and place it at 0,0,0.
- Create an empty game object at 0,0,0.
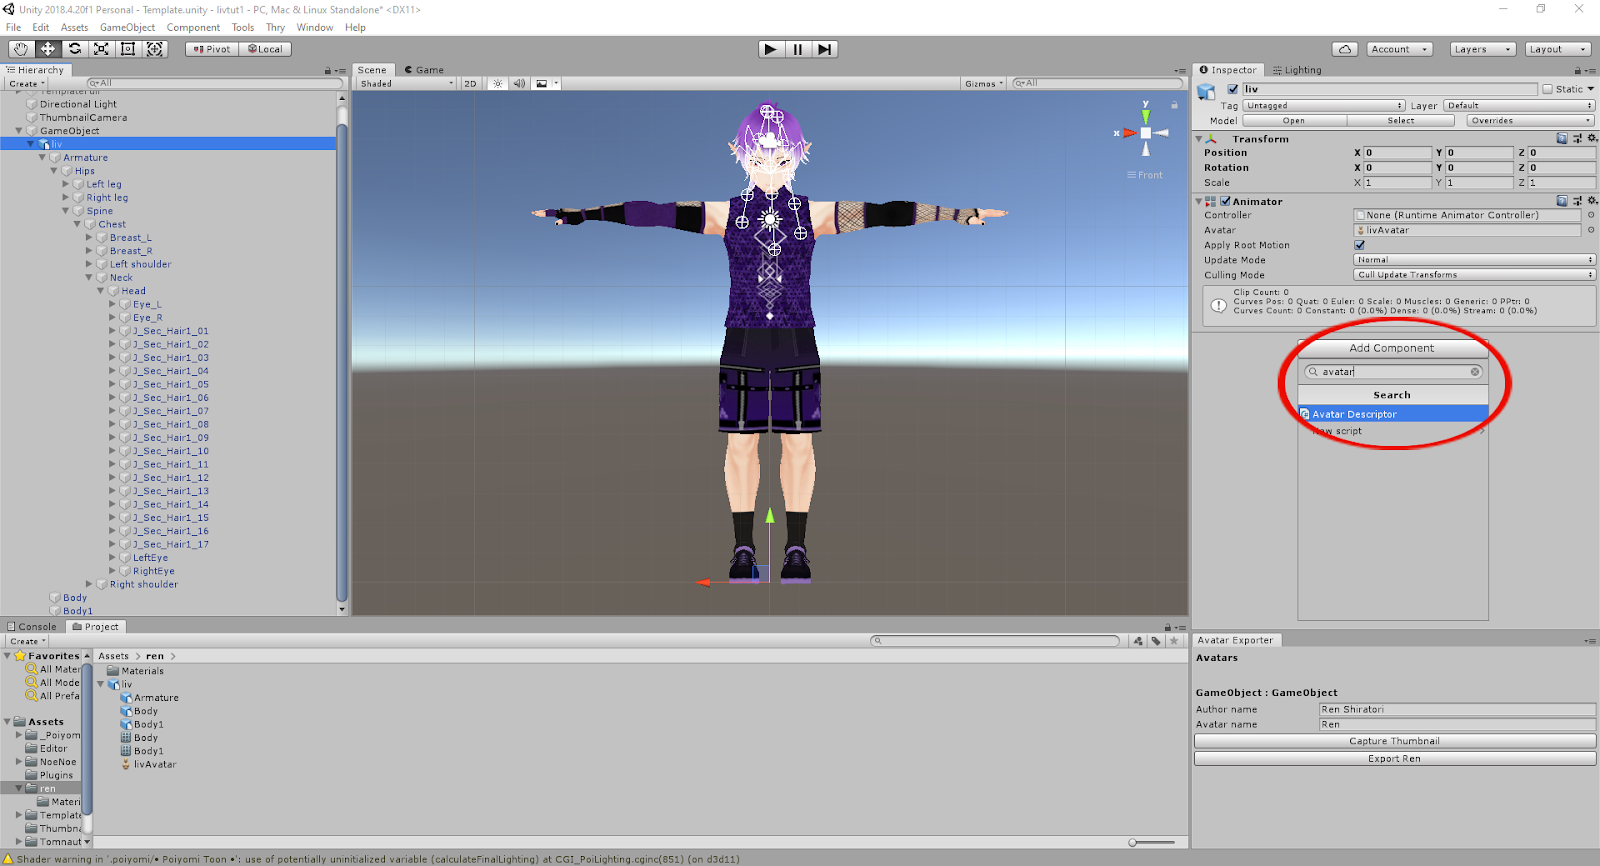
- Drag the model into the empty object you created. Add Avatar Descriptor component to the empty object. Fill in the information.
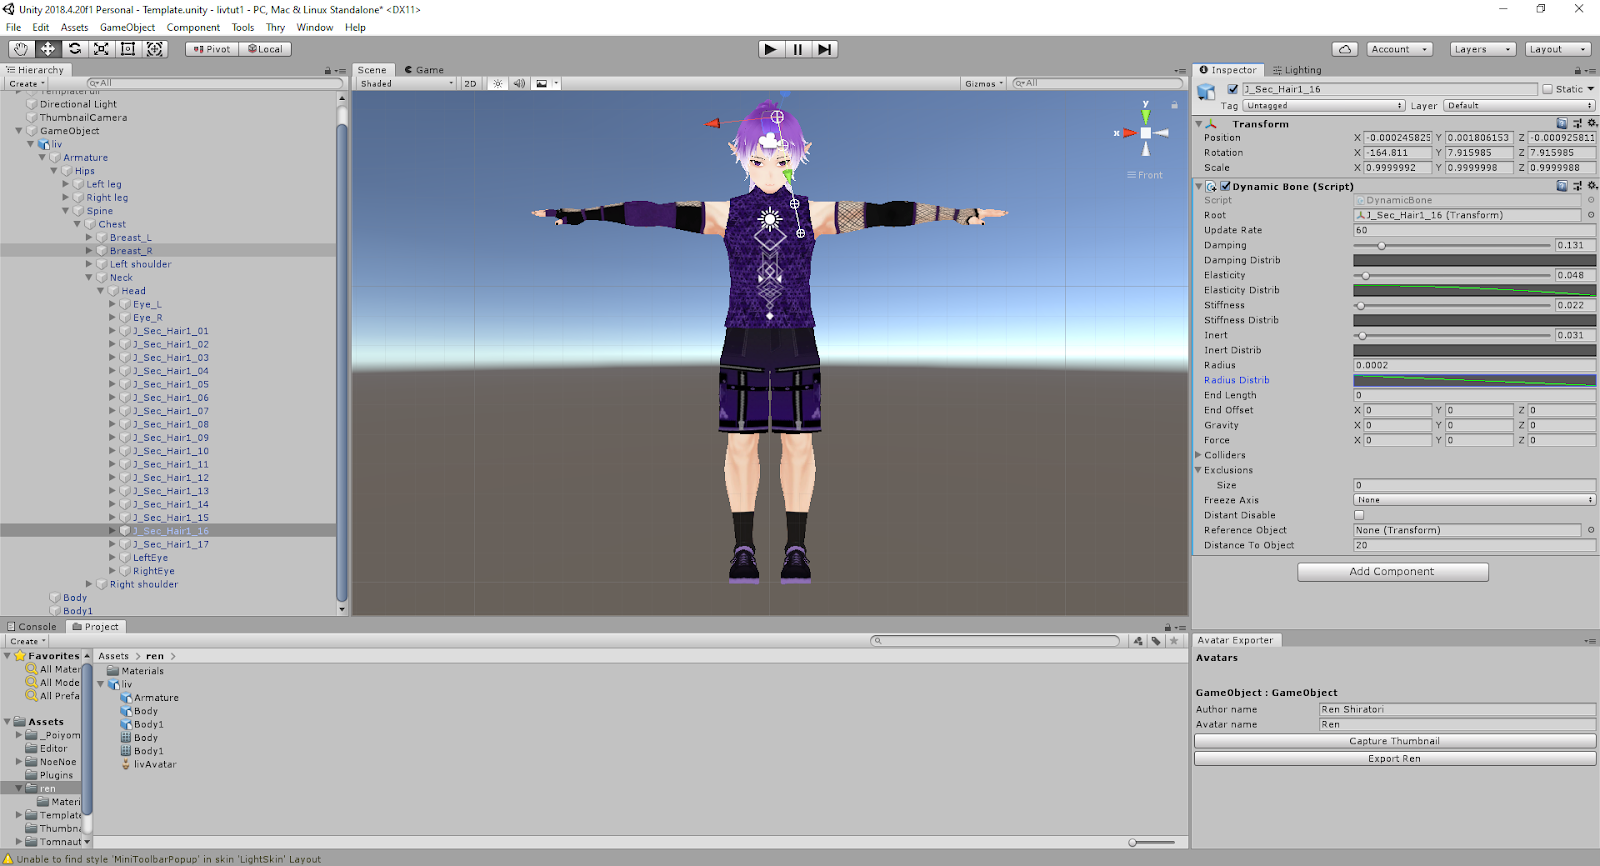
- You can add Dynamic Bone scripts and Dynamic Bones Collider scripts and set them up. The dynamic bones are in the customavatars.dll, don't load the assets from the asset store!.
- Export the avatar.
- Import the compiled file into LIV or put it in /Documents/LIV/Avatars.
Setup in more detail
- In order to use Avatars you need a 3d model that is rigged with a human skeleton. You can either commission it or download one from sites like booth.pm or gumroad.com. To edit the avatar you can use Blender which is a free program and can be downloaded from https://www.blender.org/download/.
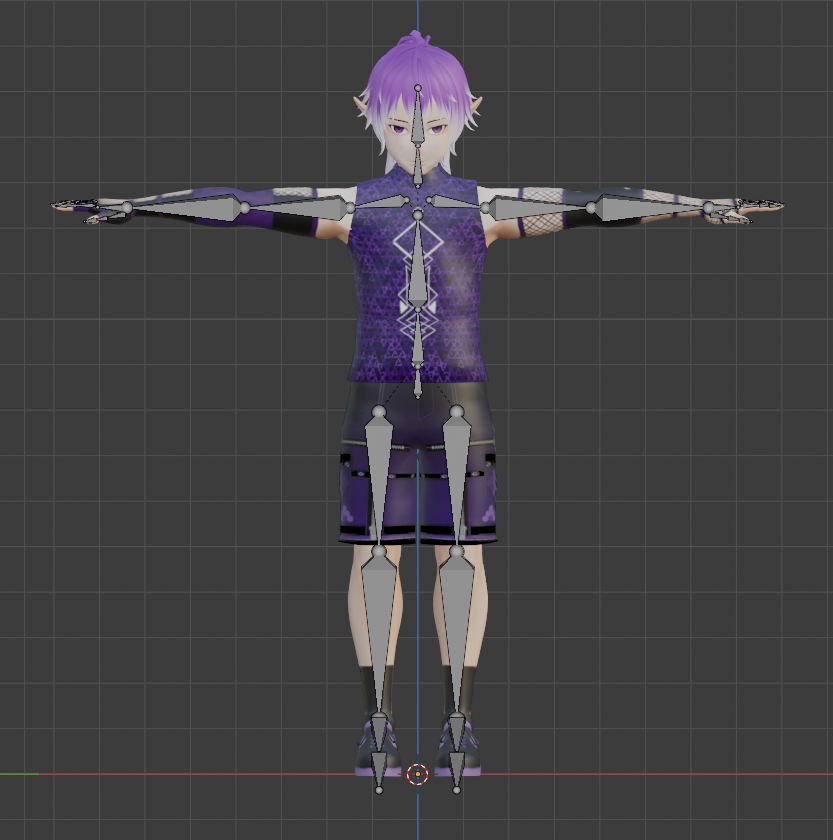
Import the avatar into Blender (this may require a certain plugin that allows Blender to import it), set it to t-pose, make sure it is rotated towards you (when you press 1) and that it has a center at its feet at 0,0,0. The model then should be exported as an FBX.
If you want to use LipSync, rename the 15 Oculus Lipsync blendshapes. They need a specific name or rather end of the name. The names are: v_sil, v_PP, v_FF, v_TH, v_DD, v_kk, v_CH, v_SS, v_nn, v_RR, v_aa, v_E, v_I, v_O, v_U. - Download Unity project -> https://drive.google.com/file/d/1YzJamlspmbri-bLa_MARe9sVZpBWaEVW/view?usp=sharing
- Download a 2018 Unity build. Go to http://unity3d.com and create an account if you already do not have one. Then download Unity Hub and download Unity that you will need for the LIV project. The recommended build is 2018.4.11f1 and can be downloaded from http://unity3d.com/get-unity/download/archive or via Unity Hub. Unity build 2018.4.20f1 works as well.
- The downloaded Unity project will need to be unzipped. It can be at any location. In Unity Hub, click on ‘ADD’ and choose the Unity project folder (you may need to change the Unity build to launch the project, if you won’t be using 2018.4.11f1).
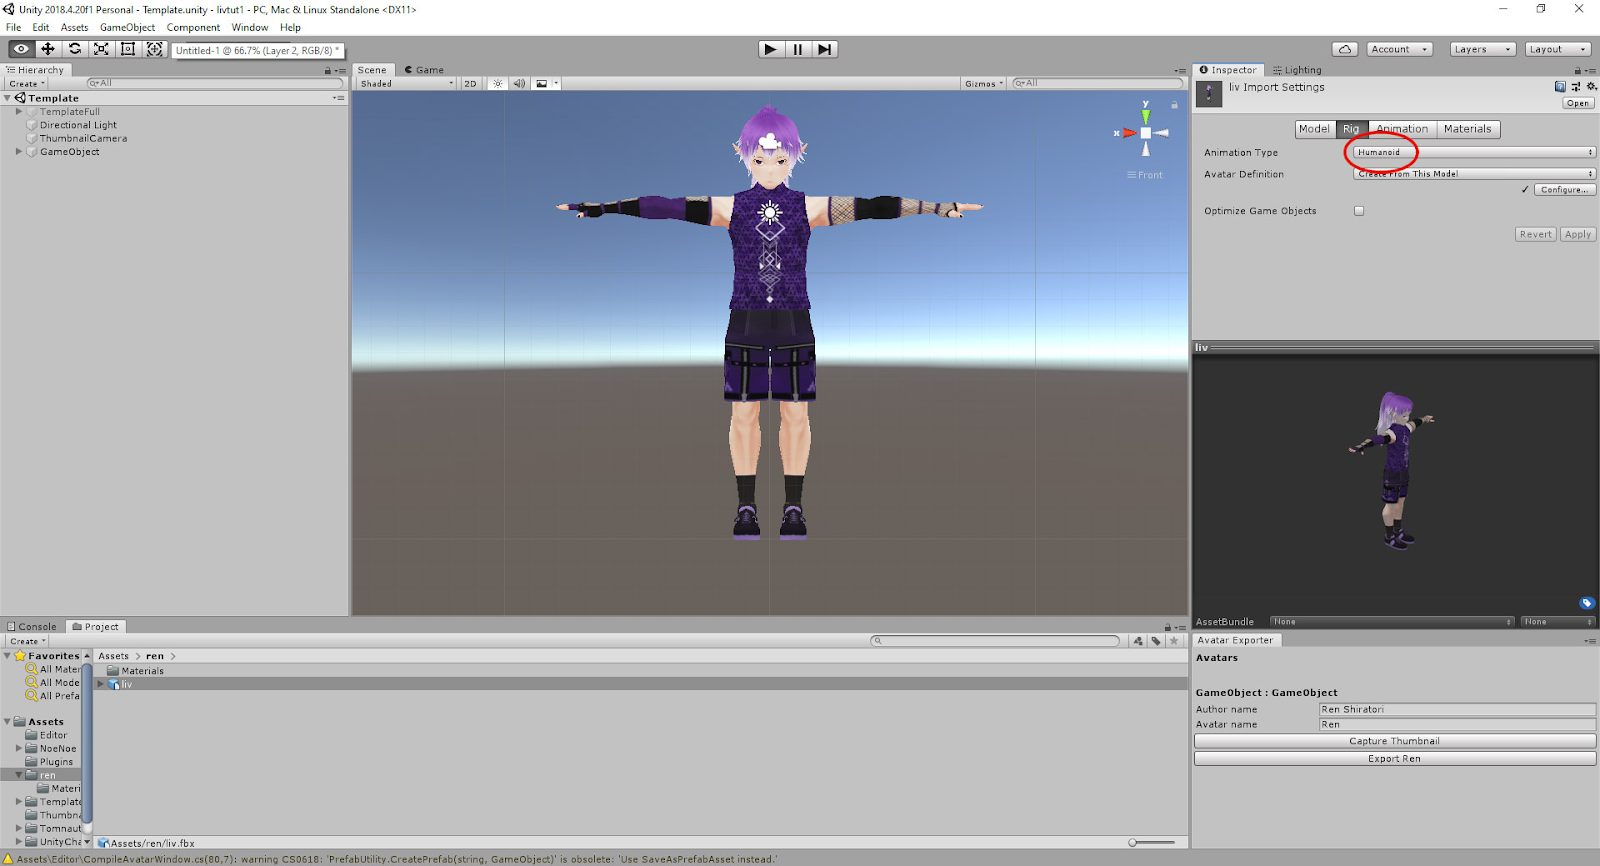
- Open the project. Click on Assets and Import New Asset. Find the exported FBX file and confirm.
- Click on the FBX file in the Project window. In the Inspector window find a tab named ‘Rig’ and click on it. Change the Rig to ‘Humanoid’ and click on Apply. When Unity is done, click on Configure and check if correct bones are assigned.
- Click on the tab Materials and extract both textures and materials (if they are included in the FBX file). Otherwise create materials in the Project window by right clicking and choosing Material. Import textures via Asset > Import New Asset.
- Drag the model into the scene and place it at 0,0,0 coordinates facing you. Assign materials you created by dragging them onto the avatar (if you did not set them up in the inspector window).
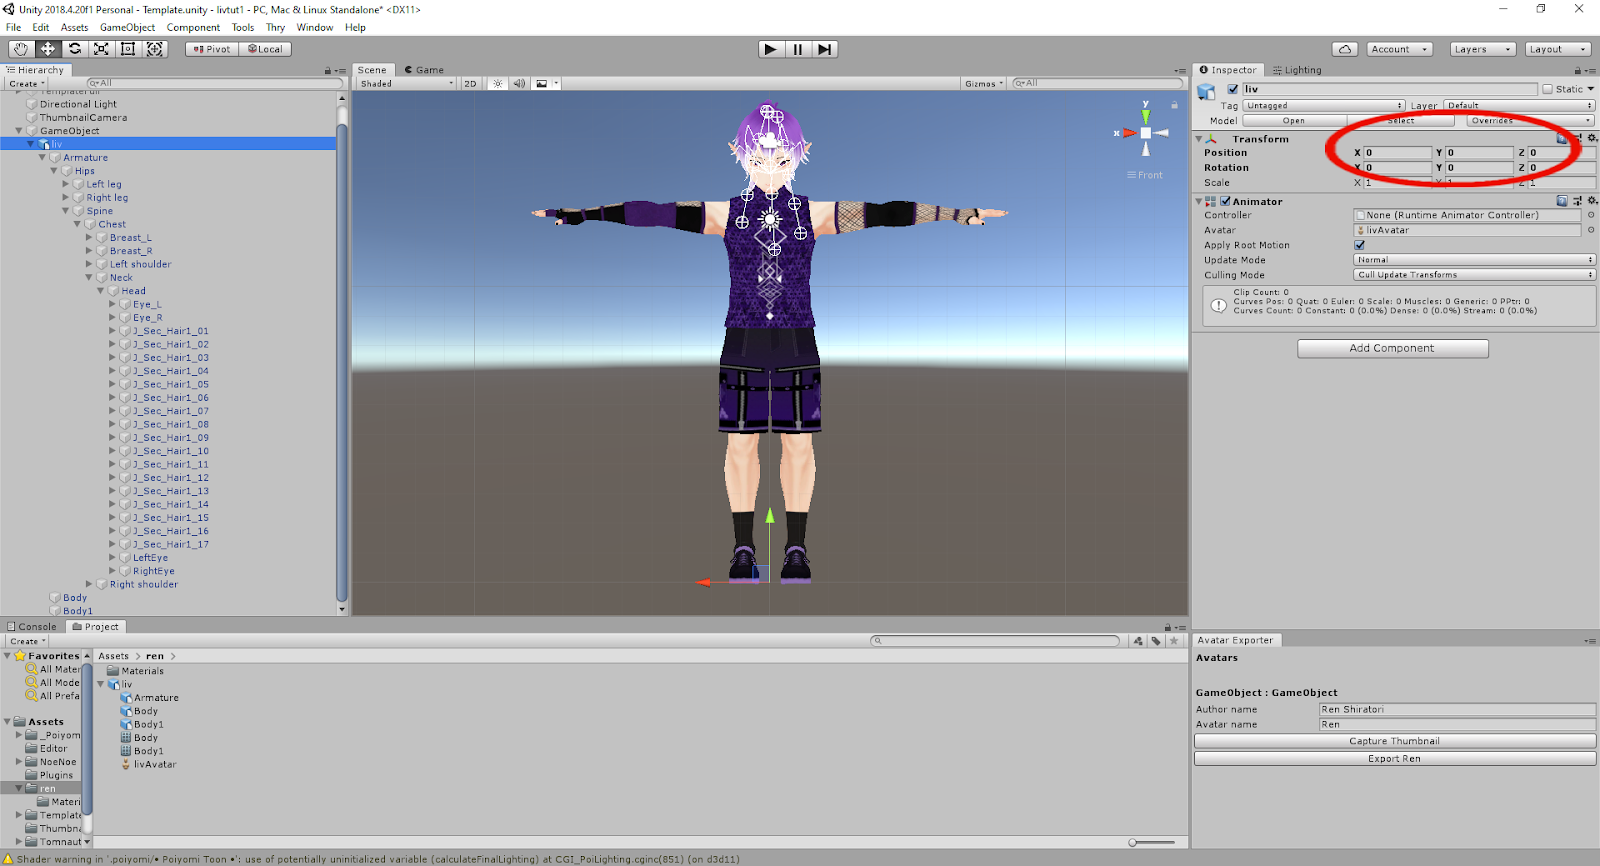
- Create an empty Game object in the Hierarchy window and place it at 0,0,0 coordinates.
- Drag the model in the Hierarchy window and drop it into the empty Game object. Unpack the object so you can click on your avatar object (click on the little arrow, no need to ‘unpack in Unity terms’).
In the Inspector window, click on Add Component. Type Avatar Descriptor and add it. You can capture a thumbnail, or import one via Import new asset. Click on the imported image and change it to 2d and Sprite (2d and UI).
- Many avatars come with extra bones that are used to make its clothes, hair or body parts move. For that you can use a script named Dynamic Bones that is already included in the customavatars.dll. You can add the Dynamic Bones script to any game object. Simply Add Component in the inspector window of the chosen game object and type Dynamic Bone. Drag the root bone of the bones you want to move into Root. Then you will have to set up the values below. You can play with these values while in Play mode (click on the Play button and then go back to Scene window). Here you can move the avatar around to see what effect the values have. When happy with the values, click on the small cogwheel of the Dynamic Bone script and copy the values. Stop the game and copy these values to the Dynamic Script (any changes in Play mode do not save).
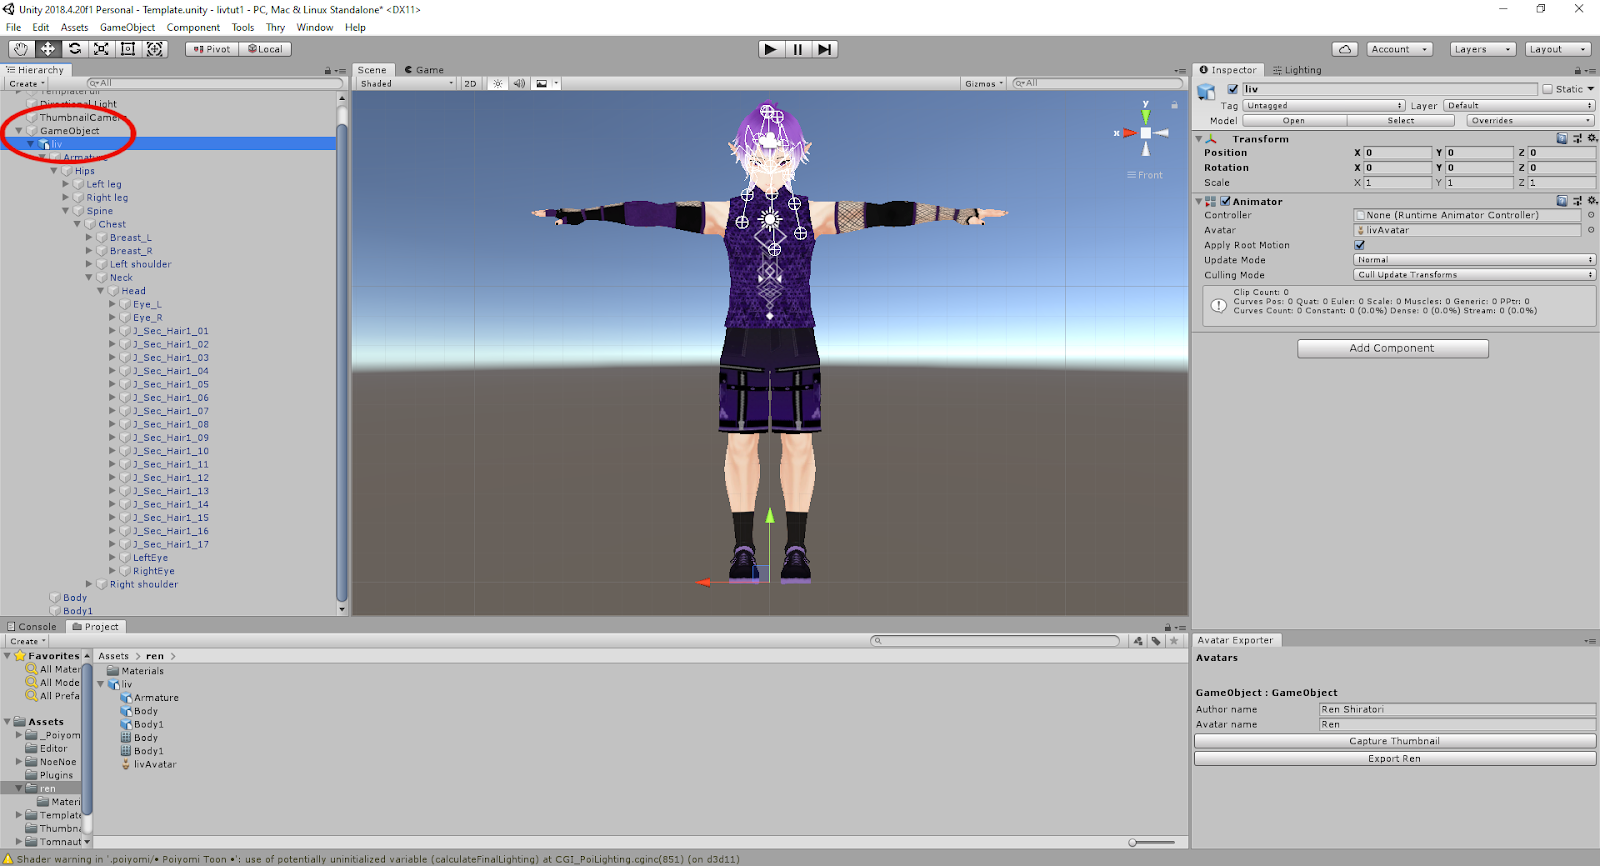
- Click on the Game Object you created and the Avatar Exporter window should appear. If it won’t you can click on Window and click on Avatar Exporter. It should show the window then. Click on Export and save it to your preferred location.
- Run LIV. Launch Avatars capture, create an Avatar camera and drag the avatar into the LIV window. Alternatively copy the exported file into ../Documents/LIV/Avatars
Supported features
Custom shaders
Dynamic bones and colliders
Lipsync
Eye gaze (bones)
Known issues
Beat Saber uses the alpha channel for bloom effects, this corrupts the alpha channel and looks wrong in LIV or it won’t load at all will result in a green outline avatar. The Beat Saber shaders that come with Nicoco007’s project are converted into Standard shaders.The avatar may not look the way it was intended when loaded into LIV. Use a different shader.
When exporting an avatar to an already existing file, the avatar may not save. Choose a different output name.
When using certain versions of free or paid Poiyomi Shaders the avatar window may ‘disappear’. If this happens you can set up your materials and lock the shaders. After the shaders compile, they will be stored in the project as separate files. Keep these files and delete the Poiyomi Shaders folder. Version 7.2.41 and lower should work without any issues (if you use .NET 4.x).
If the project contains Dynamic Bone script, either from the Asset store or simply imported from a different project, the avatar won’t compile. Simply delete the folder named ‘Dynamic Bone’ script from the project. If these scripts were used instead of the ones in the CustomAvatars.dll the avatar’s Dynamic Bone scripts will become ‘Missing’. You will have to add them again.
When importing an avatar with dynamic bones they won’t be loaded because the script in customavatars.dll is treated as a different script. You will have to delete the missing scripts from the objects and add and set up the scripts again.
VRCPhysBones can move a single bone while Dynamic Bones cannot. When setting up Dynamic Bones of an avatar that has bones for PhysBones you will need to add an end bone to the single bones. This can be done in Unity, by adding an empty game object to the respective bones.
When importing an avatar set up in Unity 2019 and newer builds, when dragging it can show up blank. Projects done in newer Unity builds are not compatible with older Unity builds and there is no magical way to make them work. You have to recreate everything you need in the 2018 Unity.
VRM Avatars
Where to get VRM avatars
You can buy VRM avatars at the LIV store at http://store.liv.tv or other stores that provide the avatars in this format, for example http://booth.pm. If you do not have any modeling experience you can still create one using a program like VRoid Studio which you can either download on Steam or from their site at https://vroid.com/studio.
Creating VRM avatars
A video showing the conversion process using UniVRM https://www.youtube.com/watch?v=YAAsgLECwHE
Any avatar can be converted into VRM format. There are two VRM formats, VRM 0 and VRM 1. Any VRM 0 file should work but some VRM 1 avatars may not work and will show up as green outline avatars in LIV. It is advised to keep the size below 64MB.
You will need a 3d model with a humanoid rig in an FBX format to convert it into VRM. The creation is done in Unity and the build will depend on the version of UniVRM you will use.
UniVRM can be downloaded at https://github.com/vrm-c/UniVRM/releases.
The export process is well documented at https://vrm.dev/univrm/export/univrm_export.html.
It requires you to create a new 3d project in Unity into which the UniVRM unity package is imported. Your avatar needs to be imported and set to humanoid rig. The materials can be configured but only VRM compatible shaders can be used MToon, Unlit (Unity) and Standard (Unity).
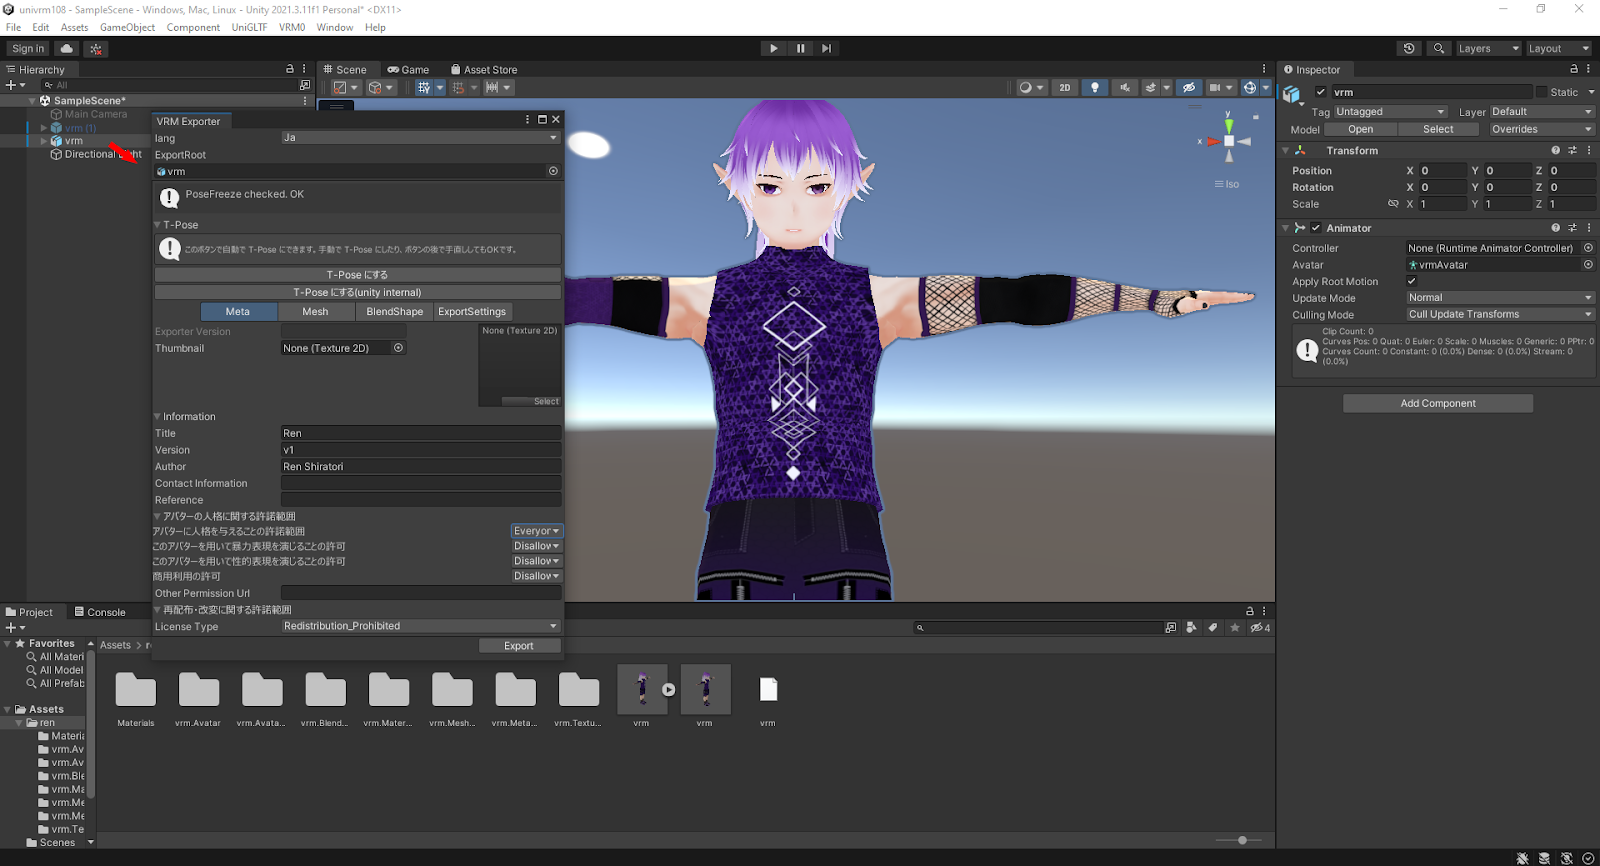
The avatar will need to be dragged into the scene and placed at 0,0,0. Then it can be exported for the first time by going to UniVRM -> Export Humanoid. After filling the data in and picking the correct root, the avatar will be converted into an unpacked VRM (you will see several folders with avatar, blendshapes, materials etc).
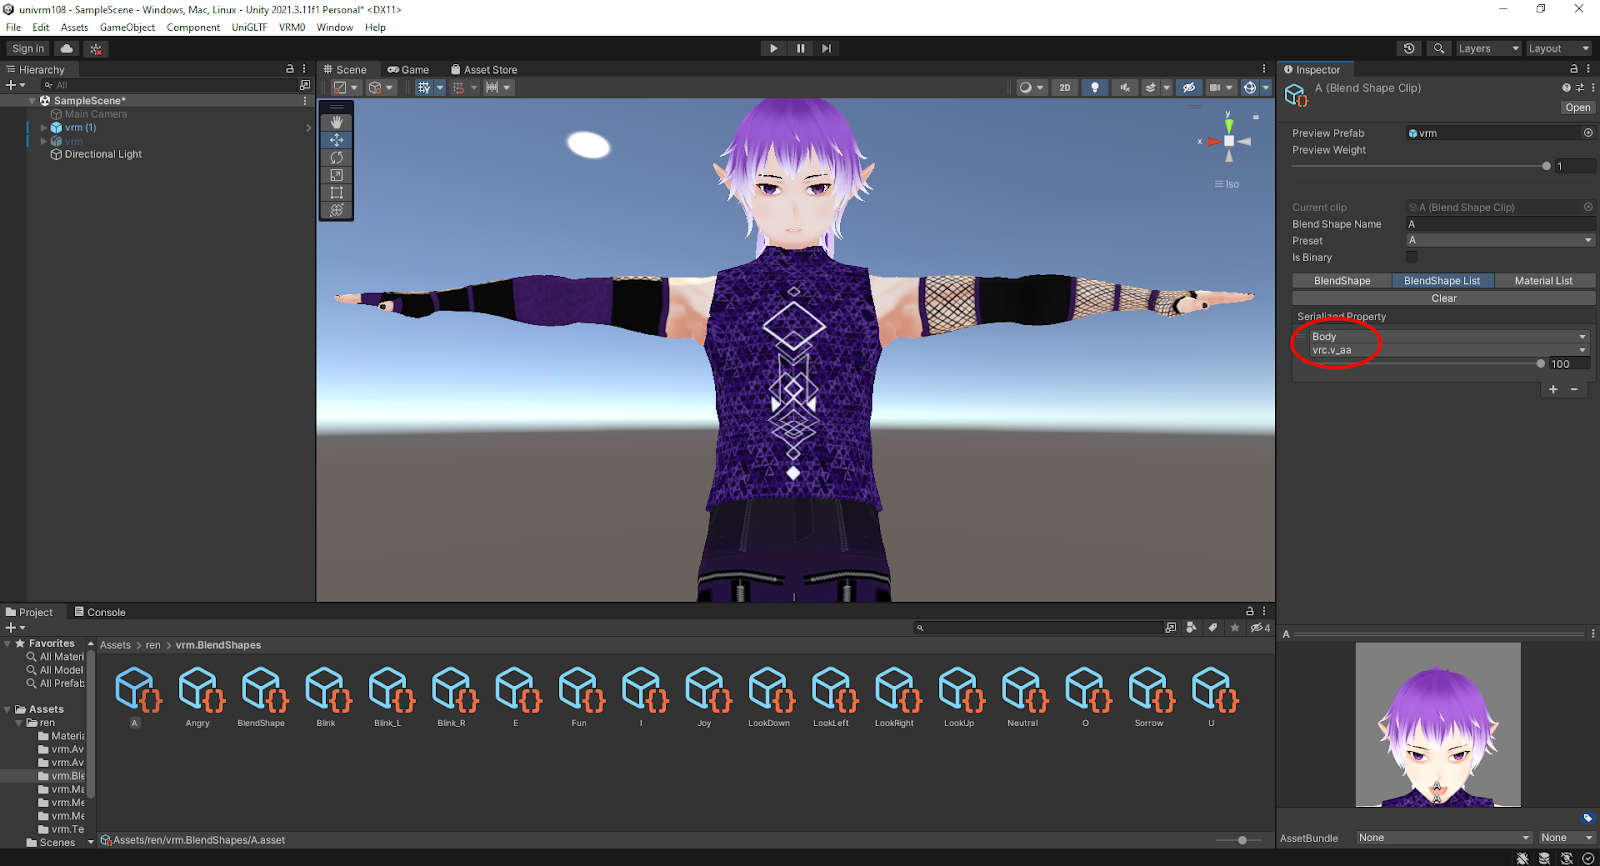
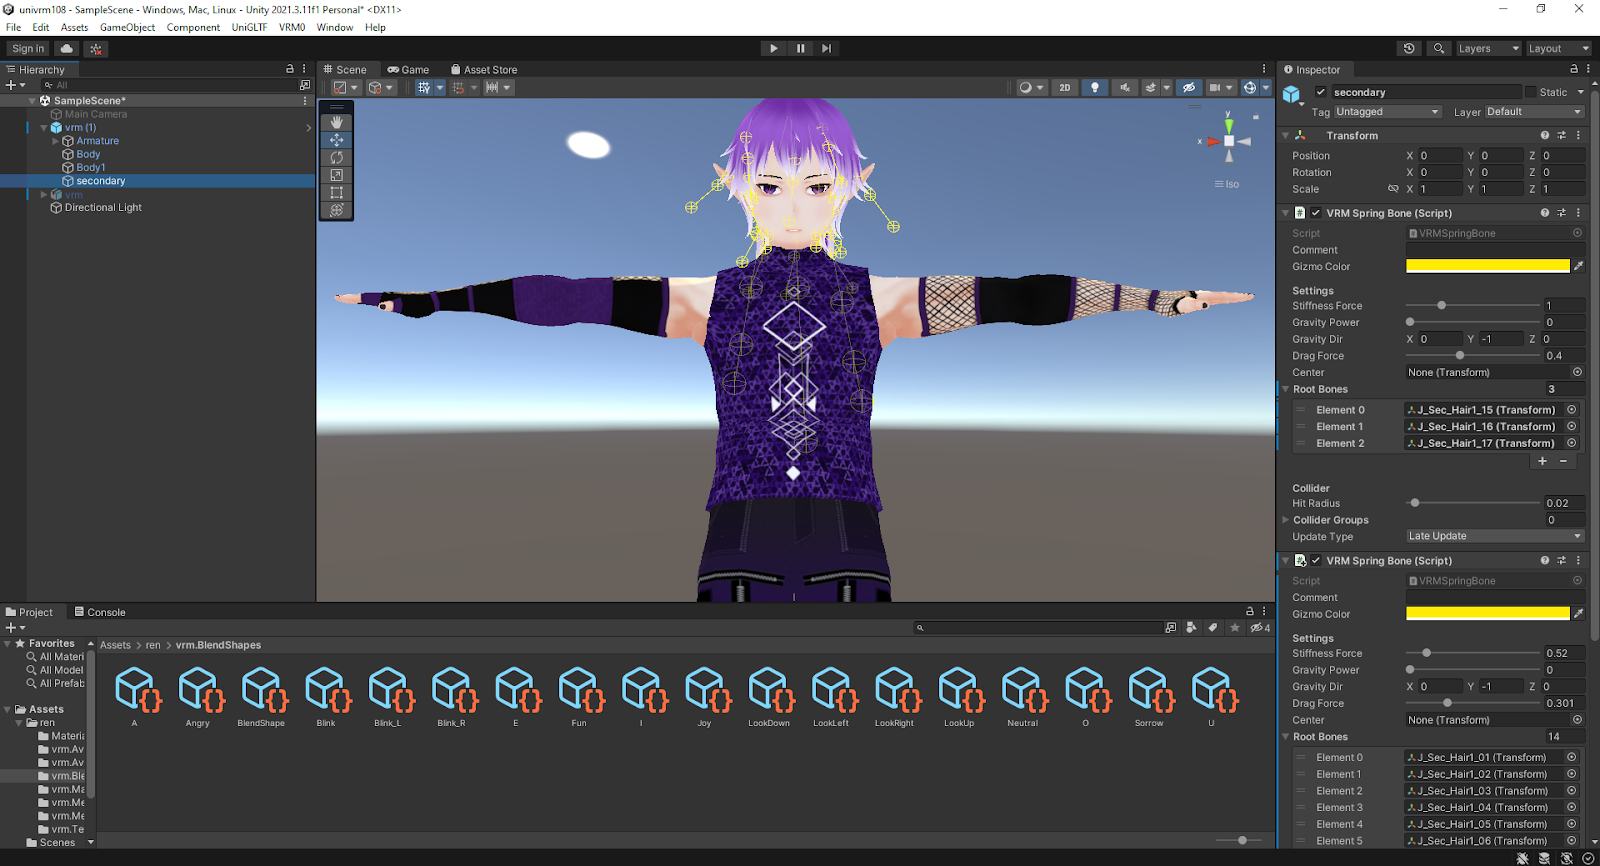
Find the VRM exported file and drag it into the scene and place it at 0,0,0. Hide the previous avatar so you can see how the VRM will look like. You can set blendshapes (https://vrm.dev/univrm/blendshape/blendshape_setup.html), VRM Spring Bones amd VRM Spring Bones Colliders (https://vrm.dev/univrm/springbone/univrm_secondary.html), and VRMLookAt. The blendshapes needed for lipsync to work are A, I, U, E, O. Navigate to the [model name].BlendShapes folder and click on one of the blendshape presets. After you click on it, click on BlendShape List in the inspector. Add what blendshape or blendshapes should form the preset. Choose what mesh they are on and then choose the blendshape you need (for LipSync all the vowel ones). Set the weight to 100 (or lower if you want). If the blendshapes require change of color or materials you can also set them up in Materials the same way (if you'd want the avatar’s face to turn red when angry for example).
After everything is set up, a second export can be done. This time you should pick a location outside of the Unity project as it will compile the avatar into one VRM file ready to be imported into LIV.
Supported features
MToon, Standard and Unlit shaders
Visemes - lip sync
Spring bones
Eye gaze (either with blendshapes or bones)
Unsupported features
Custom shaders
Audio clips
Animations
Particle systems
Known Issues
Modified versions of VRM format do not work. LIV is not compatible with VSFAvatar.
Large files may not load. You can reduce the size of textures or join meshes (keep head separate) to reduce the size (or further optimize the 3d model).
Certain VRM files usually VRM 1 files give ‘Invalid magic error’. If you encounter this problem, import the file into Blender via VRM Importer plugin, export it as FBX and set it up again in Unity and export as VRM 0.
Transparency doesn’t work with a Standard shader.
Ready Player Me avatars
You can get a free ready full body avatar for use in VR games at http://readyplayer.me. The creation process is very simple so anyone can do it. A relatively unique avatar can be created with the free assets they offer. The avatar can be then downloaded or sent to you email address or directly imported into LIV if you will use the creation process from this site https://liv.readyplayer.me/en/avatar. No matter which version of ReadyPlayerMe avatar you will generate, all are compatible with LIV.
Known Issues
Sometimes, very rarely, the import may fail. Try downloading the avatar and putting it directly into ../Documents/LIV/Avatars. If nothing you try helps you can always convert the GLB file into .avatar or VRM.
FAQ
I have a 3d model that is not rigged, can I still use it?
While you cannot use it right away, you can rig it or get it rigged. If the avatar is fairly standard humanoid looking one you can use https://www.mixamo.com/ to rig it for you. It requires an Adobe login, but the service is free.
My avatar has bent knees?
Many avatars you can download have very long legs. While you can manually edit calibration in LIV it may not be able to fix big differences in proportions of your body and the avatar’s body. The easiest way to fix the avatar is to edit it in Pose Mode in Blender. Take a picture of yourself in t-pose and import it into Blender as a background image. Click on the avatar’s armature and press CTRL+TAB. While this is primarily used to pose the avatar it can also be used to change the length of bones and the mesh ‘linked’ with the bones. You can scale the bones to do this (using the scale tool). By default scaling of bones is inherited, scaling one bone will scale other bones linked. You will need to set the Bone Inheritance to None under Bone settings of the specific bone. Once finished make sure, the avatar is at 0,0,0 position, with center at its feet. Then apply the pose as a rest pose (right click to bring up the menu).
Can I convert a Beat Saber avatar to a LIV one?
You cannot convert already compiled .avatar to another format. It has just that one single use for it was created. If you have the original file from which the avatar was created you can convert that to LIV .avatar format or VRM.
Can I convert a VRChat avatar to a LIV one?
Yes. Follow the instructions above.
Can LIV receive VMC data?
No. You can use LIV for camera and its camera plugins for mods but it cannot receive any data from VMC.
Can I use PhysBones in LIV?
No, you cannot. But PhysBones with some loss of information can be converted into Dynamic Bones that work in LIV. You can copy the values from the converted scripts and manually type them into the 2018 project (you may need to add end bones to some of the physbones).
Use this to convert the PhysBones to Dynamic Bones https://github.com/FACS01-01/PhysBone-to-DynamicBone
Is there a way for my Beat Saber avatar to have sabers in fists instead of open palms?
Yes. You can create a blendshape for fists in Blender (or Unity via pose manager) and export the avatar this way. Then find the blendshape in Unity and set it to 100%. The compiled avatar will then only appear with closed fists then though. It is advised to turn finger tracking off as it will mess the hands up.
My VRM avatar has transparent parts?
Certain shaders VRM uses may not render back faces and thus they will be seen as ‘invisible’ (see if there is a Cull Mode. By default the backside is not rendered. If there is a Cull Mode option you can choose which face will be rendered or to turn it off to render both sides. This can mess up the lighting on the model). If your model contains single faces that you want both sides to be seen you will have to make them ‘3d’. You can use the Solidify function in Blender for this for example. (Note that this will make the model way more complex).
Note: This should not be the case if you download a working avatar, but this can also happen if normals on the model are not correct (they can be recalculated or flipped in Blender).
My avatar’s legs are bent inward (or outward)?
The heads and tails of bones in avatar legs need to be in a straight line with the knees’ slightly moved forward.
My avatar is misplaced when in game?
This is usually caused by either the avatar or the parent game object not being positioned at 0,0,0 coordinates or that the center of the avatar is not at its feet.